Appendix: GitHub-RStudio Configuration
18.22 Prerequisites
Before configuring Git/GitHub and RStudio, you must first have installed the necessary tools. Install R and RStudio, or log into RStudio Server or RStudio Cloud. You will also need to create an account with GitHub.1 You may want to choose a user id that you are comfortable sharing in a professional setting (e.g., job interview), and even better if it is recognizable as you. For example, Matthew Beckman is more easily recognized by a user id like mdbeckman when compared to mdb268 or skibum25.
Verify whether or not Git has been installed already. Even if you have never used Git before, it may already be available to you (e.g., RStudio Cloud users can safely skip this).
If you aren’t sure, try this:
- Open a terminal: “RStudio >> Tools >> Terminal >> New Terminal”
- After prompt (i.e.,
$), enter these two commands one at a time (according to your operating system):
Mac OS & Linux users:
      which git
      git --version
Windows users:
      where git
git --version- If Git is installed, the result will indicate where it is located and the version found.2 If Git is not already installed, resources like https://happygitwithr.com/install-git.html among others readily available on the Internet include straight-forward instructions for a variety of operating systems. If multiple file paths are shown, look for one ending with “
.../bin/git”3 e.g., Windows path often resembles:C:/Program Files/git/bin/git.exe4 e.g., Mac OS path often resembles:/usr/local/bin/git
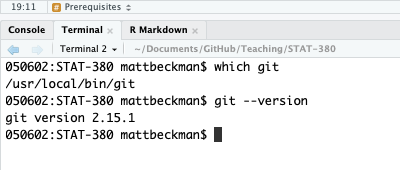
Fig. Terminal Window in RStudio
- Enable version control and set path to Git executable file. Select: RStudio >> Tools >> Global Options >> Git/SVN
- Check “Enable version control interface for RStudio projects”
- Verify path to your Git executable or “Browse” to set path shown in previous step.
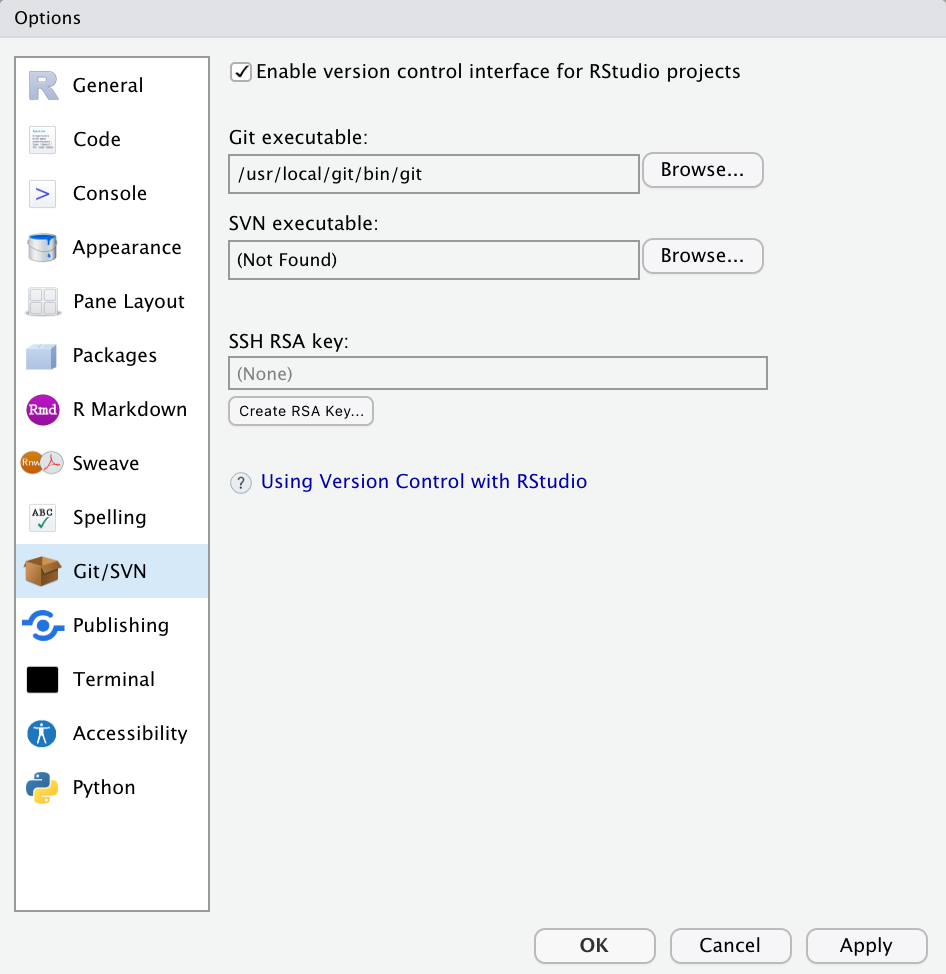
Fig. Verify that version control is enabled
Next, you need to tell Git who you are. The usethis package includes a few R functions that can help. Edit the following R commands (i.e., change the name and email address to your own) and run each one in the R console:
    library(usethis)

    use_git_config(user.name = "Andrea Carlson", user.email = "abc12@inst.edu")
    git_vaccinate()
    git_sitrep()
To clarify a few details,
user.nameshould be your proper name, rather than a GitHub ID.
user.emailmust match one associated with your GitHub profile.
git_vaccinate()is optional, but recommended (see R help for details).git_sitrep()function simply prints a “situation report” to the console so you can verify that Git properly recognizes your name and email address, among other details.
18.23 In GitHub…
Step 1. Log into your GitHub profile on the Internet.
Step 2. Create Repo for your project and initialize it with a README document (or navigate to an existing Repo)
Step 3. Click the green button “Code” and then copy the URL as shown below

Fig. Cloning a repo
18.24 In RStudio…
Now that we have identified a GitHub Repo, we are ready to configure RStudio to recognize it as a “project.”
Step 4. In RStudio Select “File >> New Project” OR Click on the “Project” menu shown in the upper right corner of the RStudio Window
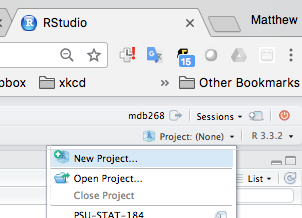
Fig. New Project
Step 5. Select “Version Control”
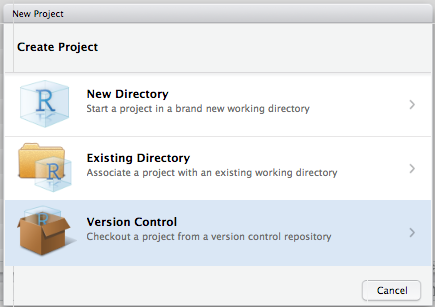
Fig. New Project >> “Version Control”
Step 6. Select “Git”
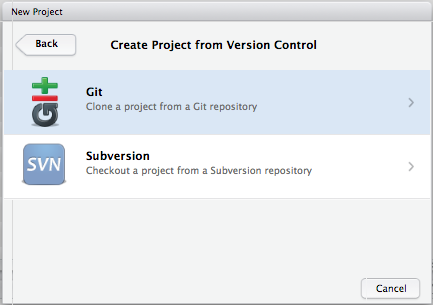
Fig. New Project >> Version Control >> “Git”
Step 7. Establish the connection (Clone Git Repository)
- Repository URL: Paste the URL that you previously copied from GitHub to “clone or download”
- Project Directory Name: This will be the name of a new folder (i.e. directory) on your computer (or RStudio server). Use the same name as your GitHub Repo (e.g. “Informative-Repo-Name” was used in the example shown).
- Create Project as a Subdirectory Of: This is the file directory location on your computer (or RStudio server) for the new folder.

Fig. Local directory
You’re in! (hopefully)… Note that the “Project” menu shown in the upper right corner of RStudio now shows the name of a Repo/Project. Also, a new “Git” tab appears and has started tracking file changes in a Repo.
- Stage changes associated with files subject to version control by selecting the adjacent checkbox.5 Only the files you select will be part of the commit; files not selected will remain available to associate with a future commit.
- Commit to save a record of your repository.6 Internet connectivity is not required to Commit, but connectivity is required for Pull and Push since these steps synch files with a remote server. Always enter an informative commit message and review the “Diff.” If there was a previous committed version of the file, Diff summarizes all changes.7 When working with RMarkdown, the Diff for the .Rmd document is sufficient since all changes to output documents (e.g., html) are subject to content of the .Rmd
- Pull to update your working copy with any changes to the Repo hosted by GitHub.8 This is especially important for Repos updated by multiple collaborators or even a single user accessing the Repo from multiple computers (e.g., a personal computer, an RStudio Server, a public computer)
- Push the committed changes to the GitHub remote server.
About 95% of the workflow can happen in RStudio for basic use in scope for this book.
- Edit files like always
- When you “save” a new or modify an existing file, it will show up in the “Git” tab in RStudio
- When you’re ready to preserve a snapshot, “Commit” the changes with an informative commit message
- Synch your local copy of the Repo with the GitHub remote server using “Pull” and “Push.”9 It is a good habit to always “Pull” before each “Push”
Occasionally, you may want to exclude a file from version control (e.g., large files, *.Rproj)10 RStudio >> Git tab >> More >> “Ignore…” or even throw out changes to a specific file and reinstate the most recent committed version.11 click the target file to highlight it and then navigate to RStudio >> Git tab >> More >> “Revert” Both actions can be accomplished directly within the RStudio IDE.
18.25 Storing credentials
If you want to prevent GitHub from requesting your username & password each time you Pull or Push, you need to cache your credentials.
Set and verify credentials. In RStudio, open a project connected to a GitHub repo and then
- “Pull” in the ‘Git’ tab of RStudio; enter your credentials when prompted.
- “Pull” a second time in the ‘Git’ tab of RStudio; you should NOT be prompted for credentials
If prompted for credentials on the second “Pull,” carefully follow the instructions again. The instructions provided rely on a credential helper that depends on your operating system and version of Git installed. If the credential helper functionality wasn’t automatically triggered, consult a more complete tutorial12 e.g., https://happygitwithr.com/credential-caching.html) and carefully follow the instructions associated with your operating system.
18.26 Help
If (when) you encounter problems you might look here first…
- Tutorials (e.g., http://happygitwithr.com/)
- Search the Internet! As a beginner, your questions have almost certainly been asked and answered on an Internet forum somewhere.
- Search again with different search terms! Stating the precise issue is sometimes challenging.
- Ask someone who has already configured it successfully